Up until now, all of the jobs defined in deploy.yml have executed in parallel. In this lesson, we’ll introduce job dependencies so that workflows run in a controlled, sequential way.
The goal of this lesson is to use those dependencies to create a GitHub release, tying together linting, versioning, and a final release step.
By the end of the lesson, you’ll see how sequential execution allows earlier jobs to gate later ones and how this pattern supports reproducible, released versions of your code.
Objectives:
Define a “Release” job that freezes code at its current state and creates a GitHub release
Understand how to define job dependencies using
needsand how to communicate between jobs usingwithDefine a dependency on the “Release” job so that it requires the “Lint + Format” and “Version” jobs to run and complete before execution
Pass the
app_versioncreated in the “Version” job to the “Release” jobExecute and test the final workflow
deploy.ymlin GitHub
👉 Step 16. Define a “Release” job
The “Release” job ties a specific snapshot of your code to a version, so you can clearly identify which version produced a given set of results.
Add this to the end of the deploy.yml file after the “Version” job:
  release:
    name: Release version
    uses: ./.github/workflows/release.yml
This will run the “Release” reusable workflow job which tags and creates a GitHub release. A GitHub release is a published snapshot of your repository at a specific point in time, usually tied to a Git tag. It can include:
A git tag, like:
v0.1.0Release metadata: The title (often the version), Release notes or a change log, marked to indicate latest release or prerelease
Optional assets: Compiled binaries, compressed archives of the codebase, installers, docs, etc.
🧰 A release allows you to freeze your code and tag it with a specific version. This release can be included in publications to link specific versions and therefore specific states of your codebase that produces specific results.
A release is a great way to provide reproducibility to your codebase, although it is not as convenient as creating and hosting a Docker container image on the GitHub container repository. The container image can be easily pulled down and executed without having to worry about setting up Python library dependencies.
Let’s take a deeper look at the release.yml:
name: (Internal) Release

on:
  workflow_call:
    inputs:
      app_version:
        type: string
        required: true

permissions:
  contents: write

jobs:
  release:
    runs-on: ubuntu-latest
    steps:
      - name: Check out repository
        uses: actions/checkout@v4
        with:
          token: ${{ secrets.PAT_TOKEN || secrets.GITHUB_TOKEN }}

      - name: Setup uv
        uses: astral-sh/setup-uv@v4

      - name: Bump and commit version
        run: |
          uv version ${{ inputs.app_version }}
          git config user.name "${GITHUB_ACTOR}"
          git config user.email "${GITHUB_ACTOR}@users.noreply.github.com"
          git commit -am "Chore: Bump version to ${{ inputs.app_version }}"
          git push

      - name: Push tag
        run: |
          git config user.name "${GITHUB_ACTOR}"
          git config user.email "${GITHUB_ACTOR}@users.noreply.github.com"
          git tag -a "v${{ inputs.app_version }}" -m "Version ${{ inputs.app_version }}"
          git push origin "v${{ inputs.app_version }}"

      - name: Create GH release
        uses: ncipollo/release-action@v1
        with:
          generateReleaseNotes: true
          name: v${{ inputs.app_version }}
          tag: v${{ inputs.app_version }}
This job is set up similarly to the other jobs we have seen so far using the same syntax and components that define a GitHub Actions workflow file.
The “Release” job performs a few tasks in order to create a GitHub release:
Defines inputs to the
workflow_callso that the “Release” job is passed theapp_versionfrom the “Version” jobChecks out the repository using a token:
secrets.PAT_TOKEN- This is a personal access token that you would create and save to GitHub Secrets (we won’t delve into this in this workshop as it covers a more advanced use case)secrets.GITHUB_TOKEN- This is a short-lived authentication token that GitHub automatically creates for every workflow run. It lets your GitHub Actions workflow authenticate to the GitHub API as the repository itself. There is no further action needed to use this token.One of these is required because the release step will commit the new version to the codebase
Set up
uvso it is available on the runner (underlying machine running the GitHub workflow)Bump and commit the version: This will set the version to the version created by the “Version” job and commit the changes made to the
pyproject.tomlanduv.lockfiles which track the current versionPush tag - Creates and pushes a tag to the GitHub repository. A tag is a named pointer to a specific commit in your repository.
Create GH release - Creates the GitHub release with release notes, a name, and a tag (which is the same as the tag created in the previous step)
👉 Step 17. Update the permissions for the “Release” job
The permissions in the release.yml file are:
permissions:
  contents: write
These permissions allow the GitHub Actions workflow to read and modify repository contents (commits, tags, releases). This way the “Release” job can create a GitHub release.
These permissions need to be propagated to the top-level workflow defined in deploy.yml in order for the “Release” job can use them.
Modify the deploy.yml file permissions which should look like this from the previous steps:
permissions:
  contents: read
To:
permissions:
  contents: write
👉 Step 18. Define a job dependency and communicate the version
Now that we added the “Release” job, how does it get the version number from the “Version” job and use it to update the version of the project, tag the current commit, and tag the release?
We need to define the dependency between the “Release” job and all other jobs and then we can use that definition to set up the inputs to the “Release” job.
Modify the current “Release” definition in deploy.yml to add in needs and with
  release:
    name: Release version
    uses: ./.github/workflows/release.yml
    needs: [lint-and-format, version]
    with:
app_version: ${{ needs.version.outputs.app_version }}needsdefines what other jobs need to run and complete before the current “Release” job can run.The “Release” job requires the “Version” job to complete before it runs as it requires the
app_versionas input but we also set thelint-and-formatreference as we don’t want to create a “Release” without running the “Lint + Format” job on the codebase. This way we know the code is well formatted before freezing it in the release process.
withprovides input parameters to the “Release” job and connects the output of the “Version” job to the input of the “Release” job.The value references the
needsfield and in particular theversionjob outputs to retrieve theapp_versionfrom the “Version” job. Remember we had defined the outputs of the “Version” job like so:on: workflow_call: outputs: app_version: description: Computed app version value: ${{ jobs.version.outputs.app_version }}And the inputs of the “Release” job like so:
on:
  workflow_call:
    inputs:
      app_version:
        type: string
        required: true
Tying it all together, we:
Defined the
app_versionoutput in the “Version” jobDefined the
app_versioninput in the “Release” jobDefined the
releasejob in thedeploy.ymlfile and set it’s dependency on the “Version” job using theneedsfieldDefined the
app_versioninput to the “Release” job usingwith
👉 Step 19. Execute a job conditionally using if
We now have a “Lint + Format”, “Version”, and “Release” jobs. The “Lint + Format” and “Version” jobs execute in parallel while the “Release” job executes sequentially after both jobs are complete. Here is the current definition file:
name: Deploy Workshop Workflow

on:
  workflow_dispatch:    # Allow manual triggering of the workflow

permissions:
  contents: write

jobs:
  lint-and-format:
    name: Lint + format
    uses: ./.github/workflows/lint-and-format.yml

  version:
    name: Compute version
    uses: ./.github/workflows/version.yml

  release:
    name: Release version
    uses: ./.github/workflows/release.yml
    needs: [lint-and-format, version]
    with:
      app_version: ${{ needs.version.outputs.app_version }}
What if the “Version” job fails to create the app_version, would we still want to create a “Release”?
Probably not, as this might create an incomplete release that doesn’t accurately capture the current state of the project and the version. This is where the conditional expression if comes in.
Add the if key to the “Release” job in the deploy.yml file so the “Release” job only runs if the “Version” job completed successfully and the app_version variable is populated:
  release:
    name: Release version
    uses: ./.github/workflows/release.yml
    needs: [lint-and-format, version]
    if: needs.version.result == 'success' && needs.version.outputs.app_version != ''
    with:
      app_version: ${{ needs.version.outputs.app_version }}
👉 Step 20. Commit and push the updated workflow
We can test the workflow now that you have an updated deploy.yml with the “Release” job, dependencies, and app_version inputs/outputs defined.
Updated deploy.yml file:
name: Deploy Workshop Workflow

on:
  workflow_dispatch:    # Allow manual triggering of the workflow

permissions:
  contents: write

jobs:
  lint-and-format:
    name: Lint + format
    uses: ./.github/workflows/lint-and-format.yml

  version:
    name: Compute version
    uses: ./.github/workflows/version.yml

  release:
    name: Release version
    uses: ./.github/workflows/release.yml
    needs: [lint-and-format, version]
    if: needs.version.result == 'success' && needs.version.outputs.app_version != ''
    with:
      app_version: ${{ needs.version.outputs.app_version }}
Let’s test the workflow by committing, pushing, and executing the workflow.
Commit the modified file
git add .github/workflows/deploy.yml
git commit -m "Add a release step to freeze codebase at a specific version"
Push the commit up to GitHub
git push origin main✅ Verification Checkpoint
The
deploy.ymlfile includes a Release jobThe Release job:
Depends on both Lint + format and Compute version using needs
Receives the version via:
with:
  app_version: ${{ needs.version.outputs.app_version }}
Includes a conditional if statement to guard execution
Workflow permissions allow releases:
permissions:
  contents: write
The updated
deploy.ymlfile has been committed and pushed
👉 Step 21. Execute the updated workflow
Go to the GitHub “Actions” tab for the project repository

Run the “Deploy Workshop Workflow” by clicking through the “Run workflow” buttons. See “Step 16. Run the GitHub Actions workflow” for details on how to execute the workflow manually

If you click on the workflow, you are directed to the “Summary” page where you will see the jobs executing. You should see the “Lint + Format” and “Compute version” job execute in parallel and then the “Release” job should execute sequentially.
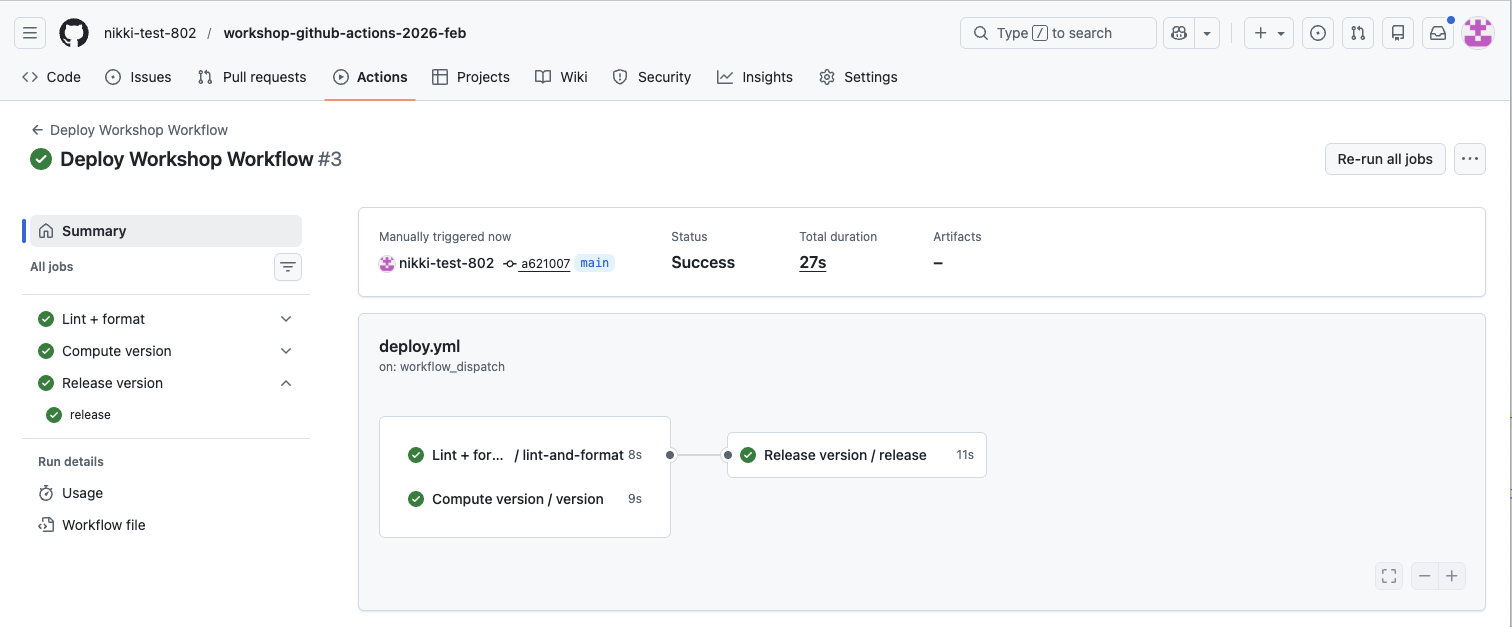
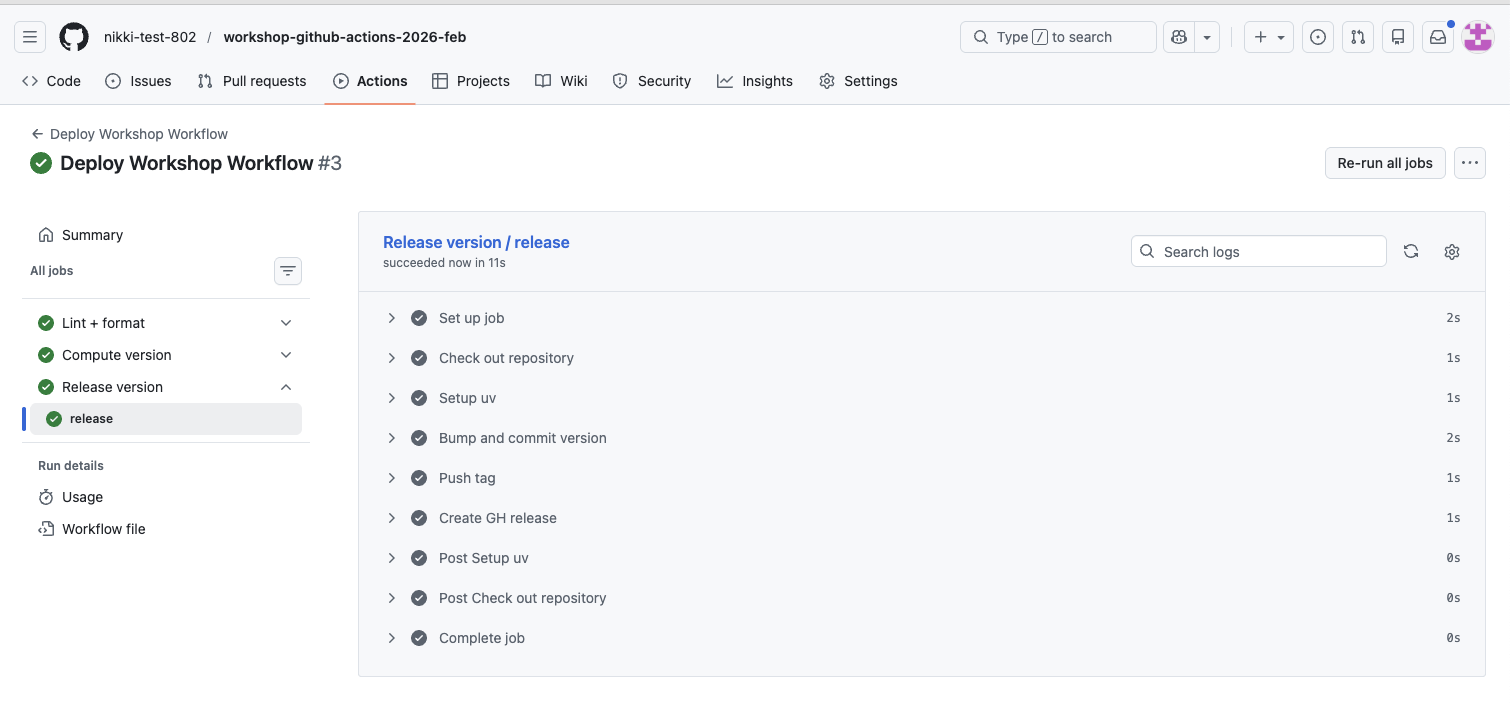
Click on the “Release version/release” job, you should see all of the “Release” job steps completed successfully. Feel free to explore each step’s logs
Verify the release was created. Navigate to the home page of the repository and look for the “Releases” section in the right column
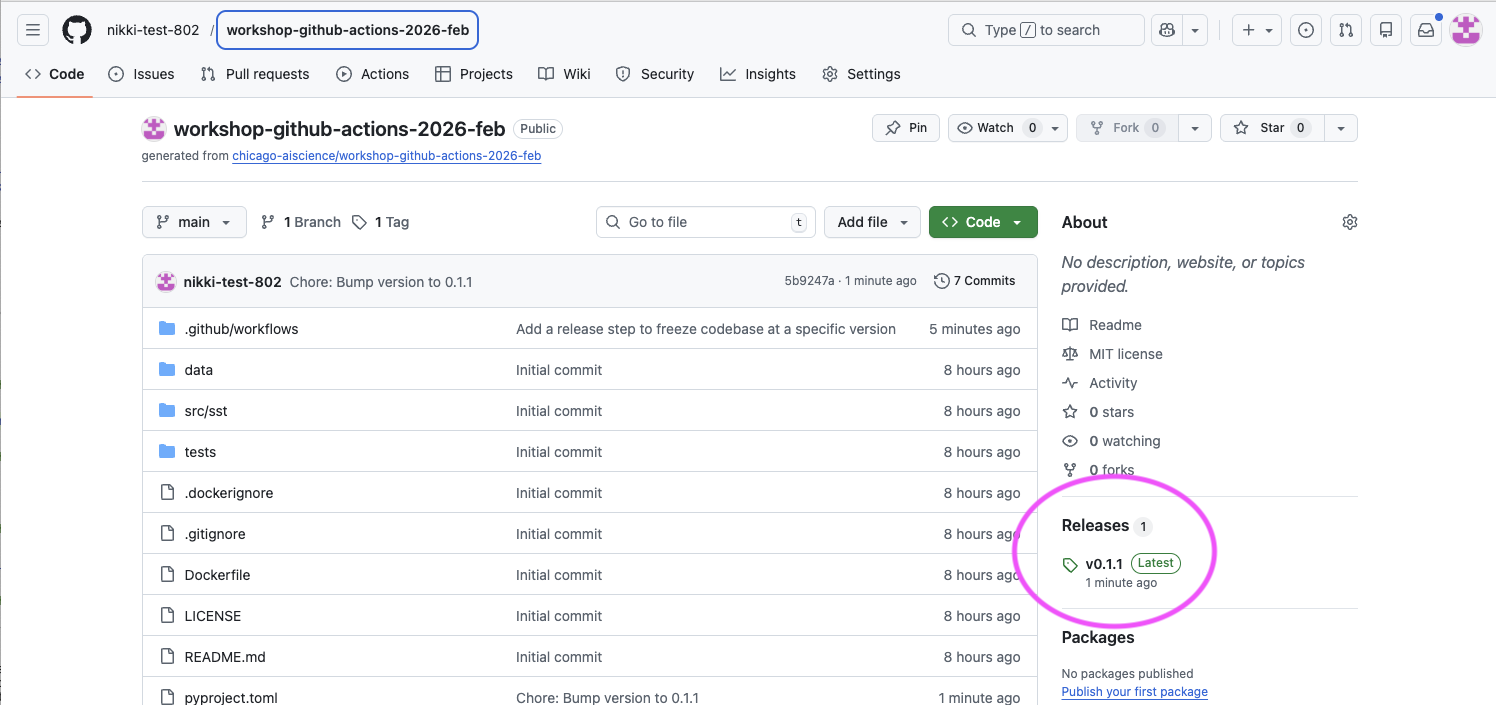
Click on the version tag, (e.g.,
v0.1.1) to view the full release details
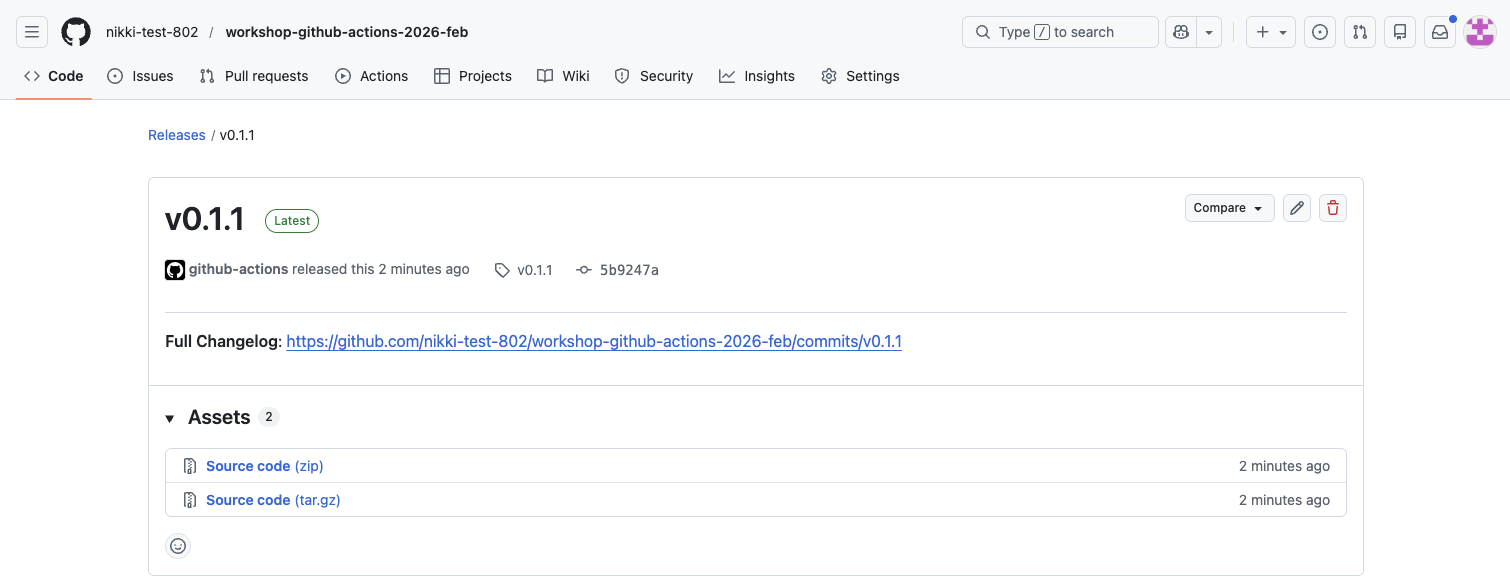
You can view the full change log of commits or you can download compressed archives of the repository codebase
✅ Verification Checkpoint
The Deploy Workshop Workflow run completes successfully
Lint + Format and Compute version run first (in parallel)
Release version runs after both jobs complete
A new GitHub release is created:
Visible under the repository’s Releases section
Tagged with the expected version (e.g., v0.1.1)
The release page shows release notes and downloadable source archives
Summary
In Lesson 1, you built a mental model for GitHub Actions and explored how workflows can support reproducible scientific code by connecting code changes to automation.
In Lesson 2, you put that model into practice by defining and running your own workflows, adding linting, formatting, and versioning to a real repository.
In Lesson 3, you introduced job dependencies and releases, tying specific versions of the code to reproducible, citable snapshots. More specifically you:
Tied a versioned release to a specific state of the code
Defined a Release job to create a GitHub release
Updated permissions to allow writing tags and releases
Added job dependencies so Release runs after Lint + Format and Version
Guarded the Release job with a conditional on a valid app_version
Committed the updated workflow to GitHub and executed
Final deploy.yml file:
name: Deploy Workshop Workflow

on:
  workflow_dispatch:    # Allow manual triggering of the workflow

# 🔍 Checkpoint #3: Update the permissions to aggregate all required from reusable workflow files
permissions:
  contents: write

jobs:
  lint-and-format:
    name: Lint + format
    uses: ./.github/workflows/lint-and-format.yml

  version:
    name: Compute version
    uses: ./.github/workflows/version.yml

  release:
    name: Release version
    uses: ./.github/workflows/release.yml
    # 🔍 Checkpoint #4: Define for any or all of the jobs you define in the deploy.yml file
    needs: [lint-and-format, version]
    if: needs.version.result == 'success' && needs.version.outputs.app_version != ''
    with:
      app_version: ${{ needs.version.outputs.app_version }}
🔍 Checkpoint #3: You can use any of the workflows listed as “(Internal)” in the .github/workflows directory in your own codebase but you will need to aggregate the permissions across all of these files and define them in the top-level deploy.yml. If you use all of the files the permissions would look like this:
permissions:
  actions: read
  contents: write
  packages: write
  security-events: read
See “Step 11. Define workflow permissions” for info on each of these permissions
🔍 Checkpoint #4: You can modify the needs field to include any of the jobs you may define in the deploy.yml and to suit your expectations of how the workflow jobs should run.
For example, you may want to implement security scanning into your workflow, so you add in the “Scan” job (
scan.yml).But you don’t want require the “Release” job to run before the code is scanned so you leave that out of the
needslist.Although it is probably a good idea to freeze your codebase on code that does not have vulnerabilities.
✨ Pause for Reflection #3 (3 min) ✨ You now know how to create a release automatically after versioning so your codebase can be referenced precisely.
What clicked, and what didn’t? Name one concept you feel solid on and one that’s still fuzzy.
Where would you place this in your real workflow?
On every push to main? Only on tagged commits? Only when a PR is merged?
What would you want included in your release “artifact set”?
source snapshot only, container image, generated figures, config files, environment lockfile, data manifest
Lesson 4 builds on this foundation with optional, advanced patterns. It shows how the same workflow structure can be extended to handle more complex execution patterns—running jobs across multiple environments and sharing files between jobs. These features are common in larger projects and collaborative codebases, but they are not required to achieve the core goals of the workshop.
This lesson is best for participants who want to run workflows across multiple environments, automate testing, or capture and reuse files like plots or reports as part of their analysis.