Objectives
Log in to the cluster, set up a software environment, and submit your first interactive and batch jobs.
HPC clusters - What is a cluster and what are the components it is built from?
Access and logging in - SSH with Duo on RCC, or with an SSH key on DSI.
Modules and software environments - Load cluster software and create an environment your jobs can use.
Scheduler, partitions, and jobs - Submit your first interactive and batch jobs.
1. What is an HPC cluster?
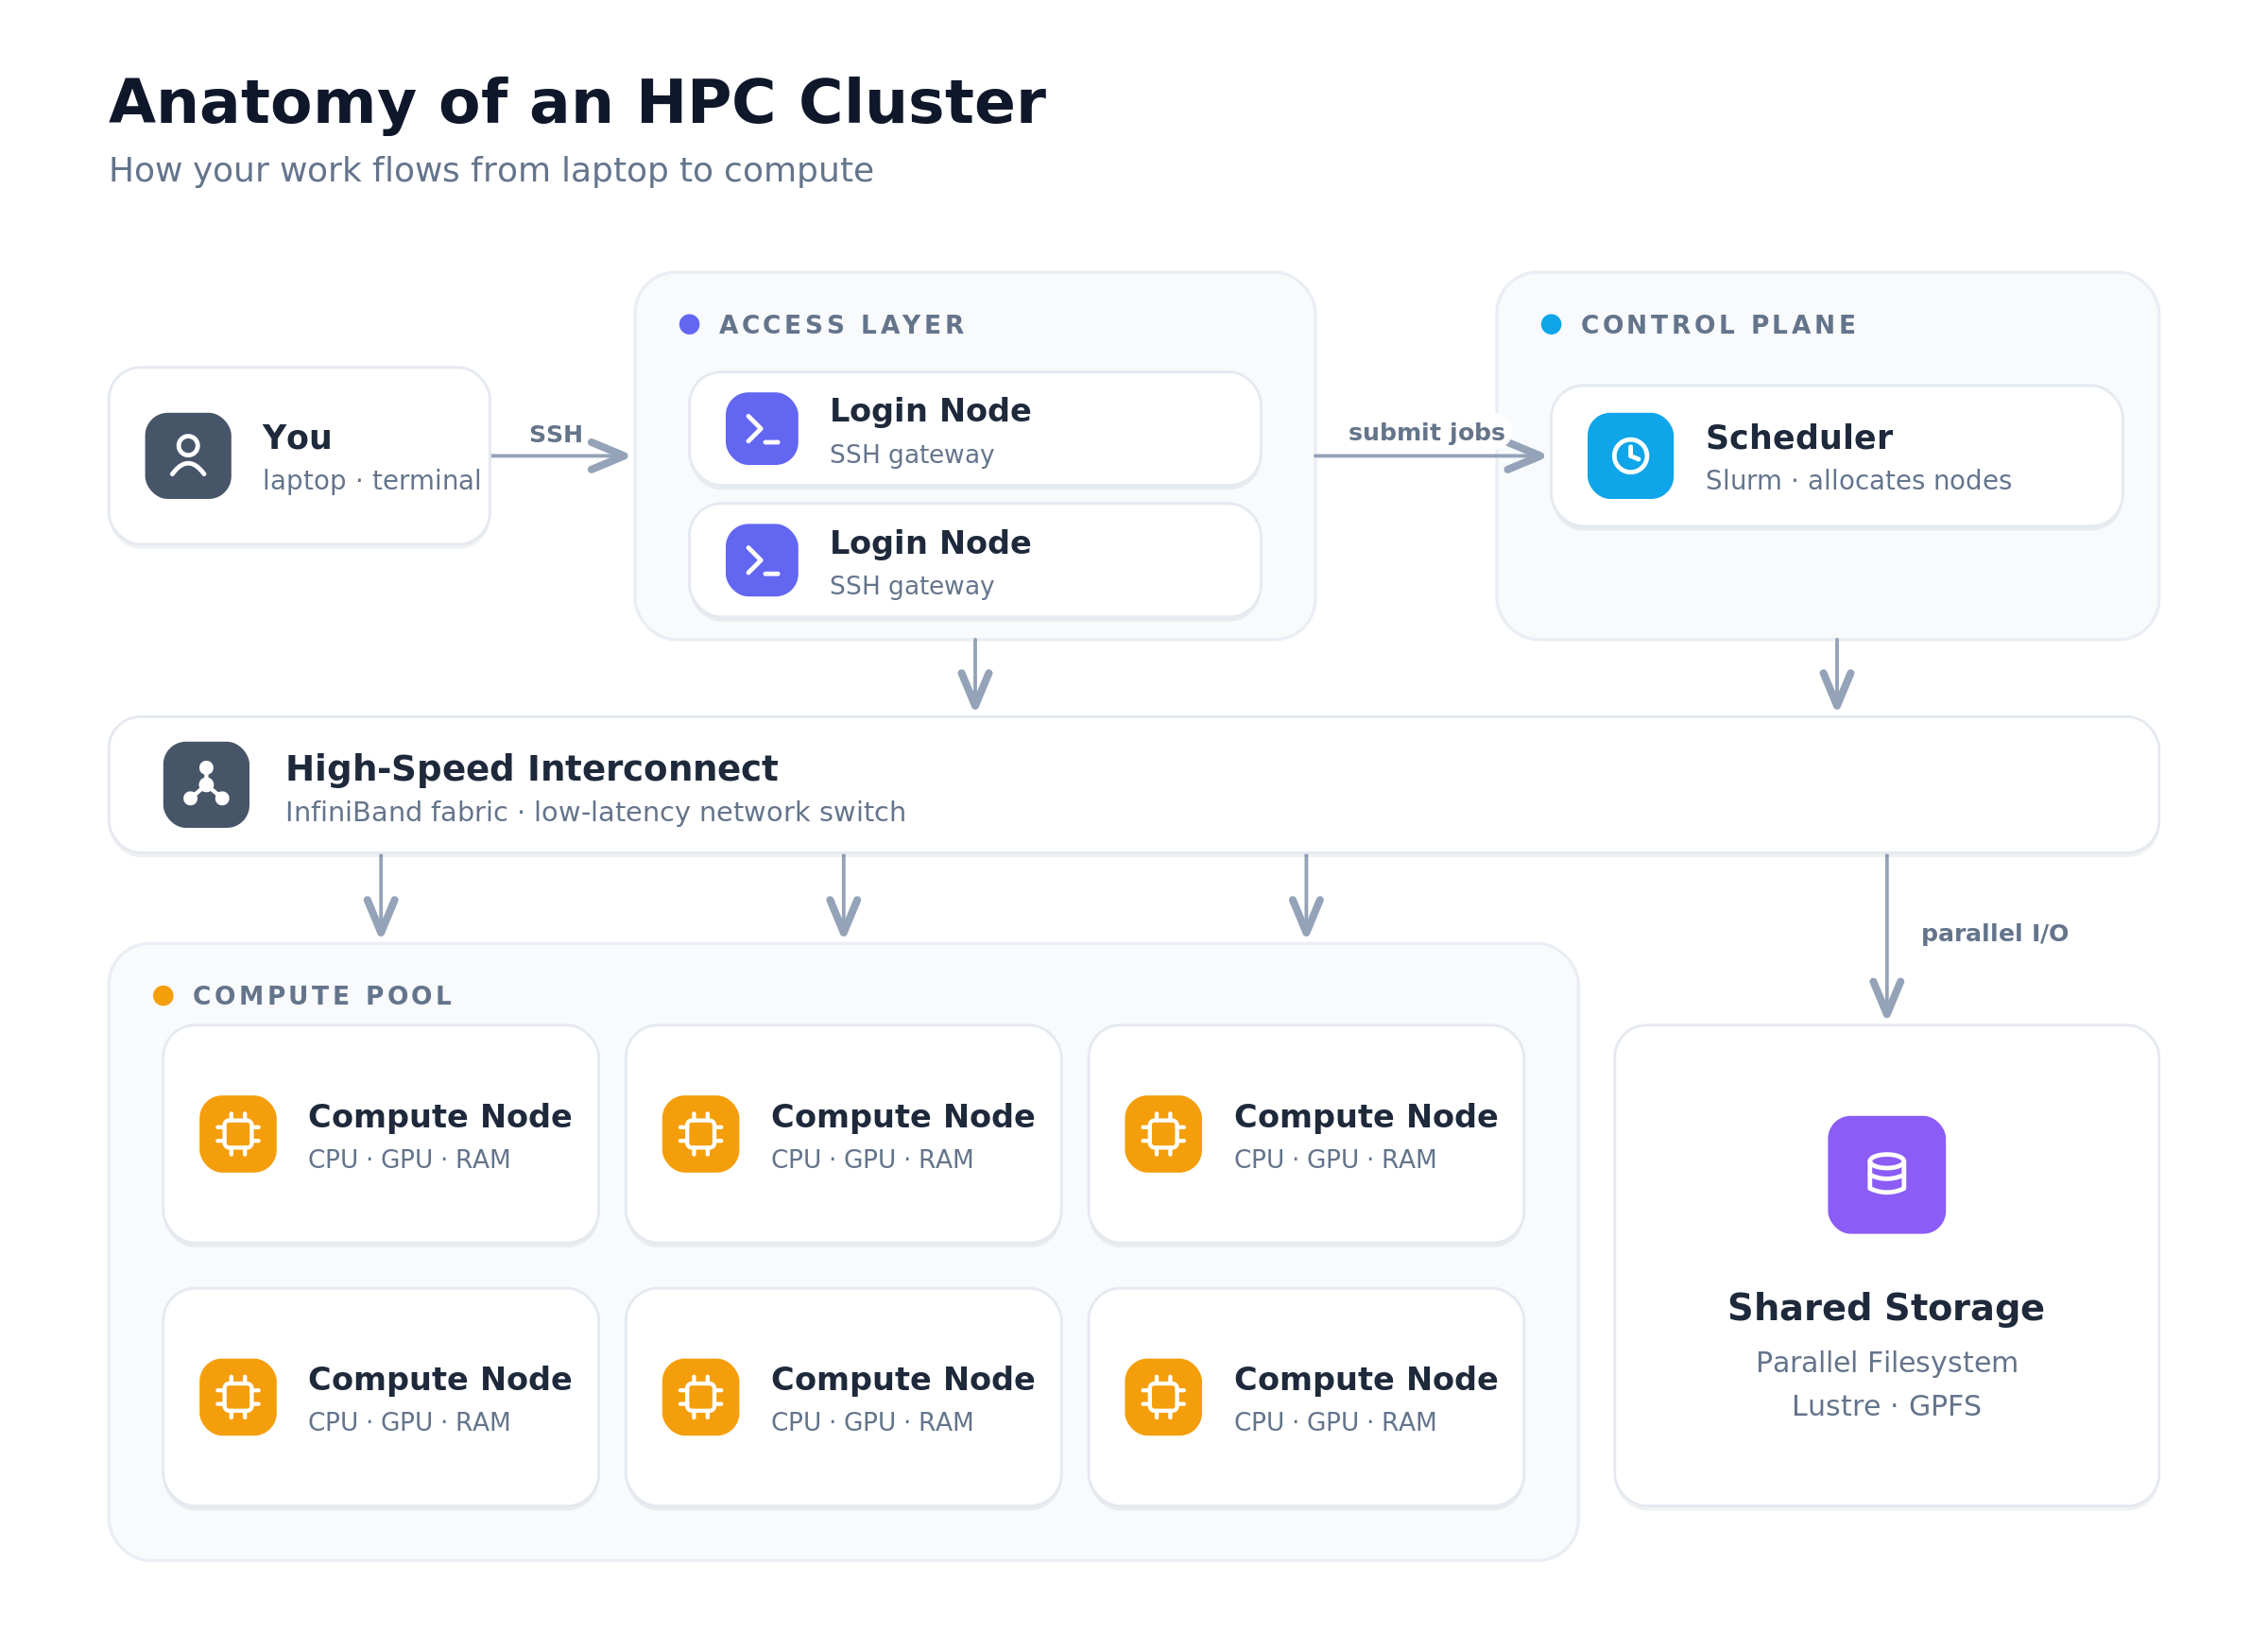
An HPC cluster is a set of connected computers that work together. Most share a few common components:
Login Nodes - Serve as primary access for the cluster. These nodes are often limited in resources (e.g., CPU, memory) and exist to allow users to access the cluster and submit computing jobs.
Scheduler - For our purposes this is SLURM (although there are other schedulers out there). The scheduler schedules and executes compute jobs on the cluster.
Jobs - How you execute algorithms on the cluster. We will learn more about jobs later in this lesson.
Compute Nodes - What the scheduler executes compute jobs on, these are network connected computers with large compute resources - high number of CPUs and memory (RAM). They can also include Graphic Process Units (GPUs) which provide even more compute power via parallelization.
Storage - Shared by the compute nodes, this is where you store your data, from short-term working files to long-term datasets. We cover the different storage options in Lesson 2.
🧰 - You do not want to execute code on the login nodes as it will slow them down and impact all cluster users.
2. UChicago HPC cluster accounts
RCC: https://
Account - Request a general RCC account.
PI association - Associate the account with a PI; for access to the Schmidt nodes, use
pi-dfreedman.More info - https://
chicago -aiscience .github .io /rcc/
DSI: https://
Account - Email
techstaff@cs.uchicago.eduto request an account.Eligibility examples - A DSI-related grant, DSI membership or affiliated faculty, or a student with written approval from a DSI faculty mentor.
More info - https://
chicago -aiscience .github .io /dsi/
3. Logging into the cluster
RCC
Documentation https://
SSH - Access the cluster via terminal; requires Duo be set up to authenticate. Docs
Open OnDemand - Web browser UI access, good for interactive sessions. Docs
VS Code - Provides a VS Code editor interface to the cluster and includes terminal access. Docs
How to SSH into the RCC cluster
ssh -Y <CNetID>@midway3.rcc.uchicago.eduYou will then need to enter your CNetID password and select an option to authenticate with Duo:
# Enter your password
(<CNetID>@midway3.rcc.uchicago.edu) Password: *

# Select an option to authenticate with Duo
(<CNetID>@midway3.rcc.uchicago.edu) Duo two-factor login for <CNetID>

# Enter a passcode or select one of the following options:

1. Duo Push to XXX-XXX-XXXX
2. Phone call to XXX-XXX-XXXX
3. SMS passcodes to XXX-XXX-XXXX (next code starts with: 2)

#Passcode or option (1-3):
🧰 - See this RCC SSH documentation for SSH authentication details + DUO multifactor authentication
DSI
Documentation https://
SSH - Follow the link above to learn how to set up SSH for the DSI cluster.
VS Code - You can also use VS Code’s Remote SSH extension to access the cluster, but need SSH set up first. Docs
4. Environment modules
On HPC clusters, most scientific software isn’t available in your shell by default. Instead, packaged tools, languages, libraries, and compilers are managed through Environment Modules - a system that lets you load, unload, and switch software versions cleanly.
A module is a script that sets up your environment (e.g., PATH, LD_LIBRARY_PATH) so a specific software package and its dependencies become available in your session. You interact with them through the module command (module avail, module load, and so on).
The benefit: no conflicting software versions, easy switching between versions, and reproducibility across compute sessions.
Modules may also provide:
Libraries - Numerical libraries used by other software.
Developer tools - CMake, debuggers, and profilers.
Language environments - Runtimes such as Perl and Java.
These support both building complex codes and running them smoothly on compute nodes.
How to run software modules
See what’s available:
module availLoad what you need:
module load <software>/<version>Check what’s loaded:
module listRun
module load <software>/<version>inside a job script or interactive session.
🧰 - Loading a module adjusts your environment so the software just works without manual path juggling.
Unload all modules from your session:
module unload <software>/<version>🧰 - This is useful when trying to define which versions of a module will work with your code. There is no need to unload modules after job execution.
5. Creating software environments
For this workshop we’ll use a conda software environment, since that is typical for scientific codebases. We need to create one that our jobs can reference when they run on the cluster.
Software environments can grow large, which can quickly fill up your home (or project) directory.
RCC storage:
Home -
/home/$USER(~30 GB)Scratch -
/scratch/midway3/$USER(~100 GB)
DSI storage:
Home -
/home/$USER(50 GB)Scratch -
/scratchand/scratch2(50 GB each)Project -
/project(500 GB default; up to 10 TB)
A good place to store your environment is the scratch/ directory - but keep in mind that scratch is periodically deleted.
This script automates the creation of the environment so you don’t have to remember a series of commands each time you need to create one: config/setup_env.sh
Commands to run the script:
cd ~/workshop-hpc-2026-sep                                      # so config/ = the project's config
SCRATCH_BASE=/scratch/midway3/$USER bash config/setup_env.sh    # run the script (bash executable)
🧰 - The script picks whichever package manager is available (conda, mamba, or micromamba). Note that it may take a while to install all the dependencies defined in environment.yml.
Key command to create an environment in case you do not want to use the script:
conda env create -p "/scratch/midway3/$USER/workshop-hpc-env" -f "/home/$USER/workshop-hpc-2026-sep/environment.yml"6. Cluster components
Slurm scheduler
The cluster includes software that manages the execution of algorithms as jobs on the cluster’s compute nodes. This software is called a scheduler and is responsible for cluster management and job scheduling.
Both UChicago clusters mentioned here use SLURM:
Allocates resources - SLURM assigns resources (compute nodes) to users (and jobs) for some duration of time.
Runs and monitors work - It provides a framework for starting, executing, and monitoring work on allocated nodes.
Arbitrates the queue - It manages a queue of pending work to arbitrate the use of cluster resources between users (and jobs).
Slurm partitions
SLURM uses partitions to logically group compute nodes, jobs, and allocations of resources.
The partitions can be considered job queues, each of which has an assortment of constraints such as job size limit, job time limit, users permitted to use it, etc.
Priority-ordered jobs are allocated nodes within a partition until the resources (nodes, processors, memory, etc.) within that partition are exhausted.
You run jobs on a partition, and it isn’t always obvious which one to pick.
For the RCC:
Partition list - Start with the RCC cluster partition description: https://
docs .rcc .uchicago .edu /slurm /partitions/ CPU jobs - It may be helpful to start by submitting CPU jobs to the
caslakepartition.GPU jobs - If you have a job that uses GPUs (like the workshop example), you can use the
gpupartition.Schmidt nodes - For the RCC cluster there is also the common Schmidt partition:
schmidt-gpu.
For the DSI:
GPU jobs - You can use the
generalpartition, and request a GPU with--gres=gpu:1.
Slurm jobs
A job is how you execute your algorithms on the cluster. There are two types of jobs: batch and interactive
batch jobs
You start a batch job by wrapping the commands that run your algorithm in a shell script.
The top of the script holds comment-like directives that tell Slurm how to run the job. Here is a simplified example:
#SBATCH --job-name=gpu_example   # <-- name of the job to execute
#SBATCH --partition=general      # <-- name to partition to execute the job on
#SBATCH --gres=gpu:1             # <-- request 1 GPU (adjust as needed)
#SBATCH --nodes=1                # <-- number of nodes to request to execute on
#SBATCH --ntasks=1               # <-- number of parallel tasks to launch across nodes
#SBATCH --cpus-per-task=4        # <-- number of CPUs to allocate to each task
#SBATCH --mem=32G                # <-- amount of RAM to allocate to the job
#SBATCH --time=02:00:00          # <-- time to execute the job for


CONDA_ENV=/net/scratch2/$USER/workshop-hpc-env  # <-- software environment created in step 5
conda activate "$CONDA_ENV"      # <-- activate the environment

module load cuda  # <-- load modules required to execute job

python your_algorithm.py  # <-- Execute your algorithm code
Let’s say we save this script to a file called my_job.sh, then to submit this job you run the following command on the login node of the cluster:
sbatch my_job.shinteractive jobs
Sometimes it can be useful to launch a terminal shell on a compute node directly.
Interactive jobs are ideal for:
Debugging jobs that fail in batch mode
Testing software environments and modules
Running short experiments or exploratory analyses
Developing code before scaling up to batch jobs
Basic interactive CPU job:
srun --partition=general --nodes=1 --ntasks=1 --cpus-per-task=2 --mem=4G --time=01:00:00 --pty bash -iBasic interactive GPU job (note the added --gres=gpu:1):
srun --partition=general --nodes=1 --ntasks=1 --cpus-per-task=2 --mem=4G --gres=gpu:1 --time=01:00:00 --pty bash -i🧰 - Notice how the arguments to the srun command match the
#SBATCHcomments in the batch script. You can change these to manage the resources allocated to your interactive session.
👉 7. Running an interactive job
We’ll now turn to the workshop repository to run an interactive job, then submit the same work as a batch job on the RCC cluster.
Repository link: https://
Working interactively first lets us get a feel for the cluster and develop the algorithm before scaling it up to a batch script.
The seven steps we’ll walk through:
👉 1. Log into the cluster
ssh -Y <CNetID>@midway3.rcc.uchicago.eduEnter your <CNETID> password and then authenticate with Duo.
👉 2. Clone the GitHub repository to the cluster
Note this requires SSH authentication be set up between GitHub and the cluster. See SSH + GitHub
Start the SSH agent and load the SSH key you created:
eval "$(ssh-agent -s)"
ssh-add ~/.ssh/id_ed25519
Clone the repository:
git clone git@github.com:chicago-aiscience/workshop-hpc-2026-sep.git
cd workshop-hpc-2026-sep
👉 3. Set up the environment (once)
Run the following command to set up the conda environment in your scratch space:
SCRATCH_BASE=/scratch/midway3/$USER bash config/setup_env.sh # run the script (bash executable)👉 4. Copy the data to the cluster
This is a quick preview of the data storage lesson which we will cover in more detail. For now, download the input data needed to run the workshop repository code to your laptop: https://
The data is on the smaller side (~61M) so lets just copy it via scp:
mkdir /scratch/midway3/$USER/workshop-hpc-data/  # create a directory to hold the data

scp -r /path/to/input/directory/on/your/laptop <CNetID>@midway3.rcc.uchicago.edu:/scratch/midway3/$USER/workshop-hpc-data  # copy the data to the cluster
👉 5. Define the data paths on the cluster
Modify config/paths.sh for the RCC cluster:
#!/usr/bin/env bash

# Read-only project inputs: the workshop mini-dataset.
export INPUT_DIR=/scratch/midway3/$USER/workshop-hpc-data/input

# SoS results (per-reach algorithm discharge + Confluence consensus).
export SOS_FILE="$INPUT_DIR/eu_SOS_mini.nc"

# SWOT Validation Set: observed daily gauge discharge = the training TARGET.
export SVS_FILE="$INPUT_DIR/svs_mini.nc"

# ML-prior flow statistics per reach (extra features).
export PRIORS_FILE="$INPUT_DIR/priors_mini.csv"

# Experiment config: model + training knobs AND data.basins, tracked in Git.
export EXPERIMENT_CONFIG="config/experiments/baseline.yaml"

# Where jobs write manifests, checkpoints, predictions, results (scratch, NOT $HOME).
export WORK_DIR=/scratch/midway3/$USER/workshop-hpc-data/output

# Conda/micromamba env (a name, or a full prefix path for a -p env).
export ENV_NAME=/scratch/midway3/$USER/workshop-hpc-env

mkdir -p "$WORK_DIR/data" "$WORK_DIR/runs"
👉 6. Grab an interactive GPU
srun --account pi-dfreedman \
     --partition schmidt-gpu \
     --qos=schmidt \
     --nodes=1 \
     --ntasks=1 \
     --cpus-per-task=2 \
     --mem=4GB \
     --gres=gpu:1 \
     --time=01:00:00 \
     --pty bash -i
--pty bash drops you into a shell on the compute node. Confirm the GPU:
nvidia-smi # should list one GPU👉 7. Run the model on one basin
# Load the paths you defined
source config/paths.sh

# Load the python module - can locate with `module avail`
module load python/anaconda-2025.12

# Activate conda environment
conda activate $ENV_NAME

# Build a tiny training manifest for a single sub-basin (232270 = upper Loire):
# one row per (reach, SWOT overpass) with the algorithm discharges + gauge target.
# --basins overrides the config's data.basins for this quick smoke test.
python src/build_manifest.py --config "$EXPERIMENT_CONFIG" \
    --sos "$SOS_FILE" --svs "$SVS_FILE" --priors "$PRIORS_FILE" \
    --basins 232270 --mode train --out "$WORK_DIR/tiny.csv"

# Train the learned-consensus model for a single epoch as a smoke test.
python src/train_consensus.py --config "$EXPERIMENT_CONFIG" \
    --manifest "$WORK_DIR/tiny.csv" --out "$WORK_DIR"/consensus --epochs 1
Watch the loss print. When it finishes, exit releases the node.
👉 8. Running a batch job
Now we’ll run those same steps as a batch job defined by a shell script: slurm
#!/usr/bin/env bash
#SBATCH --job-name=consensus-train
#SBATCH --account=pi-dfreedman          # Schmidt fellows PI account
#SBATCH --partition=schmidt-gpu         # GPU partition for Schmidt fellows
#SBATCH --qos=schmidt
#SBATCH --gres=gpu:1                    # request 1 GPU (adjust as needed)
#SBATCH --nodes=1
#SBATCH --ntasks=1
#SBATCH --cpus-per-task=8
#SBATCH --mem=32G
#SBATCH --time=02:00:00
#SBATCH --output=logs/train_%j.out      # stdout  -> normal log  (Lesson 3)
#SBATCH --error=logs/train_%j.err       # stderr  -> error log
# --- Lesson 1: a first batch GPU job. Submit with: sbatch slurm/02_train.sbatch

set -euo pipefail
source config/paths.sh

# Load required modules
module load python/anaconda-2025.12

# PyTorch from the conda env bundles its own CUDA runtime, so a system CUDA
# module is usually NOT needed (only the node's NVIDIA driver). Load one if your
# cluster has it, but never let a missing module abort the job.
module load cuda 2>/dev/null || echo "[job] no 'cuda' module; using conda torch's bundled CUDA"
source activate "$ENV_NAME"           # conda env from environment.yml

# 1. Build the training manifest: one row per (reach, SWOT overpass), joining the
#    algorithm discharges + prior features with the observed gauge TARGET.
python src/build_manifest.py --config "$EXPERIMENT_CONFIG" \
    --sos "$SOS_FILE" --svs "$SVS_FILE" --priors "$PRIORS_FILE" \
    --mode train --out "$WORK_DIR/data/manifest_train.csv"

# 2. Train the learned-consensus model. Model + training knobs come from the
#    experiment config; pass a flag like --epochs to override for a one-off.
python src/train_consensus.py --config "$EXPERIMENT_CONFIG" \
    --manifest "$WORK_DIR/data/manifest_train.csv" \
    --out "$WORK_DIR/runs/consensus"

echo "training complete on $(hostname) job $SLURM_JOB_ID"
🧰 - set -euo pipefail stops the script on any error so there are no silent failures.
To run this script as a batch job:
cd $HOME/workshop-hpc-2026-sep
mkdir -p logs  # create a logs directory for job logs
sbatch slurm/02_train.sbatch
View job status for running job:
squeue -u $USERExample output:
            JOBID PARTITION     NAME     USER ST       TIME  NODES NODELIST(REASON)
        51473191 schmidt-g consensu ntebaldi  R       0:06      1 midway3-0426
Review logs:
cat logs/train_51473191.err # error logscat logs/train_51473191.out # standard out logs✅ Verification Checkpoint
You learned what a cluster is and how to run jobs on one
You set up the workshop repository on the RCC cluster with
git cloneYou created a software environment with the dependencies needed to run the workshop code
You copied the input data to the cluster
You ran an interactive job and executed the first stage of the workshop code
You ran a batch job that executed the same stage
Lesson Conclusion
You have run a job on the cluster!
Next we’ll look at moving data onto and around the cluster - and where to put it.